Manage users, user settings
General overview: users list
The administration of users takes place in the menu item "Users". Here you can add new users for the resource portal and/or backend and edit and delete existing ones. Here you have an overview of the users assigned to your organization.
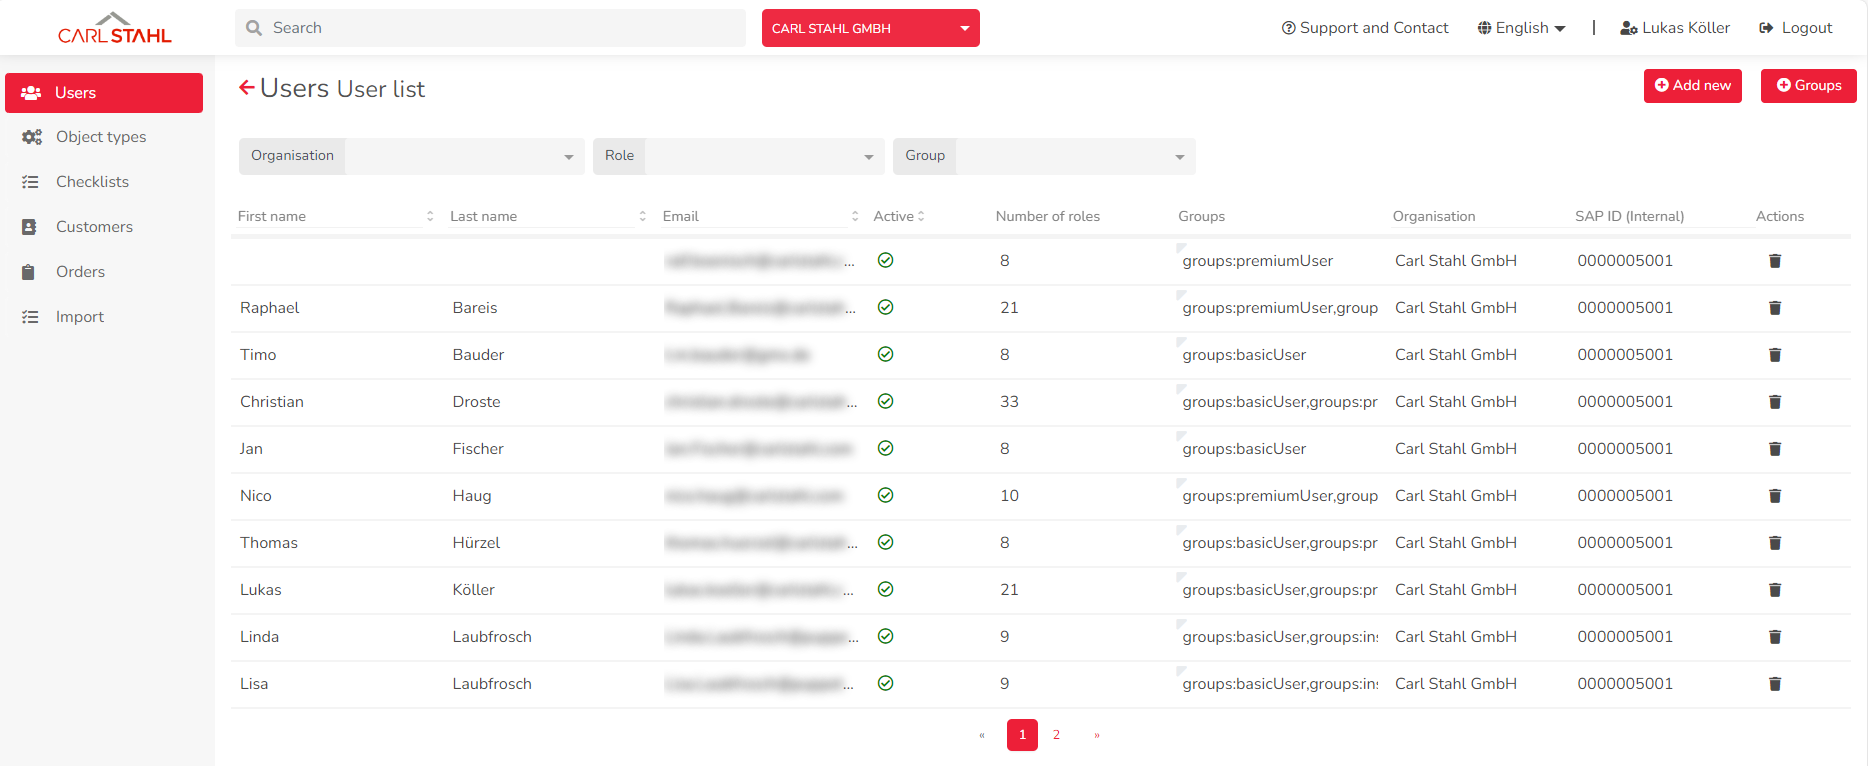
The columns First Name, Last Name and Email have a search and sort function. By clicking in the column header, you can search for specific names or email addresses. The sorting function is activated by clicking on the arrows to the right of the column header.
.gif?inst-v=f08e09e7-d79a-4ae4-9b31-9b58bd1f82cb)
The email addresses are blurred in the table for privacy reasons. If you move the mouse over an e-mail address, it will be displayed in plain text.
The column "Active" in the overview shows whether the user is active or inactive. Inactivating the user denies him the right to access the equipment portal and he can no longer log in. (see Delete and inactivate users )
Create new users
Add new User
Delete / inactivate users
Delete and inactivate users
User settings
User settings in this context means: You define the permissions in the Carl Stahl solutions. Not to be confused with the profile settings such as 2-factor authentication into the backend.
By clicking on the user you want to edit, you will get to the user settings of this user.

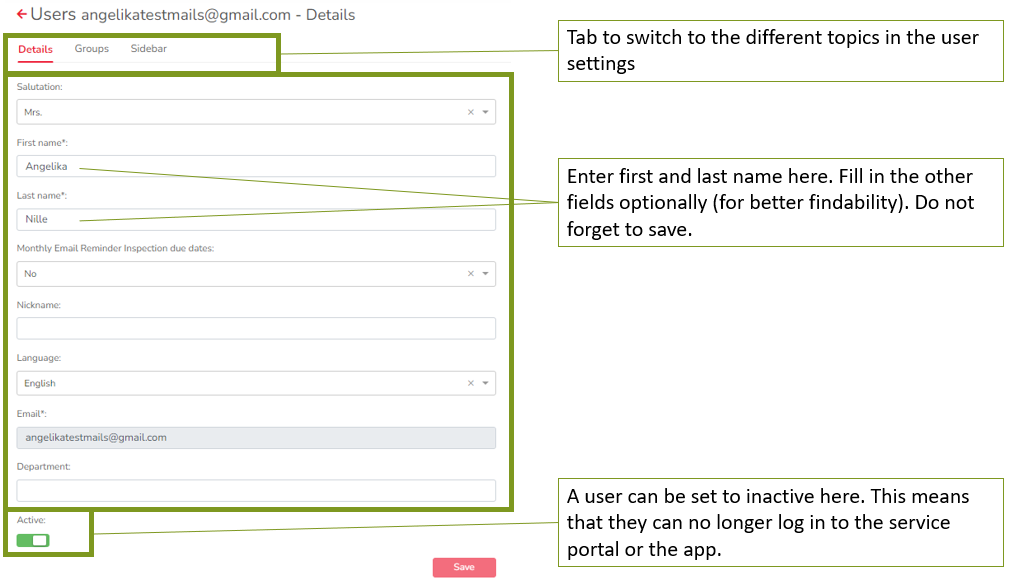
User settings - Tab “Details”
In the "Details" tab, information such as a user's first and last name can be changed. It is also possible to set a user as active or inactive. Once a user has been saved as inactive, they will no longer be able to log into the equipment portal.
If you change the language of the user in these settings, the language of the user in the portal will change.
Please note: The email address is the ID of the user in the equipment portal. For this reason, it is not possible to adjust or change a user's e-mail address. If the e-mail address of a user has changed, the user must be created again.
User settings - Tab “Groups” for changing authorization groups
The "Groups" tab shows, which permission group the user is assigned to. Here, the new group can be selected in the dropdown above the table and assigned via "Add". Since the authorization groups build on each other, multiple assignment is possible. Decide accordingly which rights the user should have and add these permissions all together.
The overview below shows which roles are included in the assigned group and which roles the user has. In this overview you can also delete a permission group.
Note: You can only add groups that you own. Also, the groups that the user already has are grayed out.
User settings - Tab “Sidebar”
The Sidebar tab can now be used to customize the sidebar that will be displayed to the user in the backend. To do this, you must have appropriate permissions to the individual menu items so that you can then display or hide these permissions at this point. Since this menu item is only a display, this function is not detailled more in this documentation.
User settings - Tab “Customers”: Add/change functional locations
The "Customers" tab shows which customers or functional locations a user has currently added. The overview shows the name of the customer, its SAP ID, as well as the info whether subordinate functional locations should be displayed or not. Through the backend, it is now possible to give a user access not only to an entire customer, but also to individual functional locations.
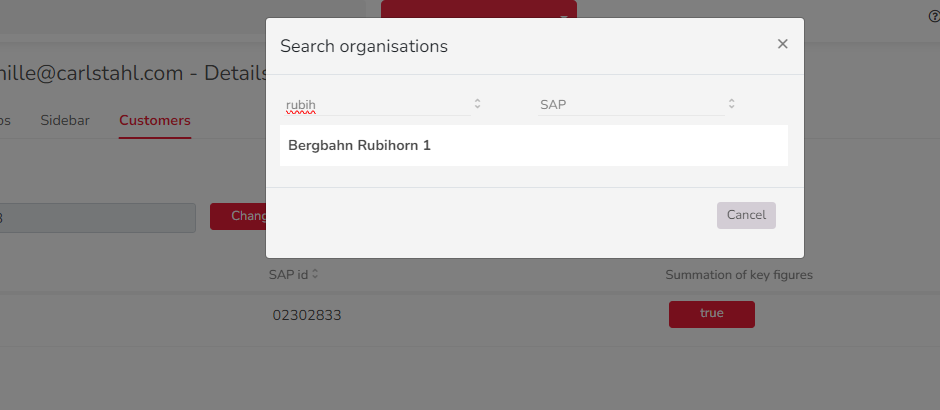
Add functional location: An additional functional location is added via "Add functional location". A pop-up window opens where you can either search for the name of the customer/functional location or for the SAP ID. By clicking on the corresponding entry in the list, the functional location is added.
If the user is to have access to the entire organization, the top functional location must be selected (8-digit SAP ID) and the setting "true" must be stored. If, on the other hand, you want to give the user differentiated rights for individual functional locations, this is also possible. For this purpose, the respective functional locations must be specifically assigned. This can be useful, for example, if the production manager only wants to view the functional locations around the production.
If no functional location is added, nothing will be displayed when logging into the equipment portal.
Display subordinate functional locations: After adding a customer or a functional location, "Show subordinate functional locations" can be used to specify whether or not subordinate functional locations should be visible to the user. "True" means that subordinate functional locations may be displayed, while "false" prevents display.
Remove functional location: The trash can icon can be used to remove a customer or TP from a user. The user will then no longer have access to it.
-20230912-162608.gif?inst-v=f08e09e7-d79a-4ae4-9b31-9b58bd1f82cb)
Note: It is only possible to add TP that belong to the organization and are owned by the user who wants to assign them.
User settings - Tab “customers”: Change the user’s organization
The assignment to a company ("Organization") is also done in the "Customers" tab. The company selected in this dropdown will be displayed in the portal as "Inspection company", if the user adds a inspection to an equipment. You can change this organization via the button "Change". A pop-up window opens in which it is possible to search for organizations. The assignment of an organization is possible by clicking on the entry in the list.
The organization controls on whose behalf the user adds an inspection and thus which organization is listed as the issuer in the certificate.